Building the Blog Pt. 1: Starting the web application
The first run at getting everything ready
This is the second post in a series of posts about how I attempted the Cloud Resume Challenge.
Intro: The Cloud Resume Challenge and Building the Blog
Part 1: This post
The first requirement for the challenge was getting a website up and running behind a load balancer. The suggested path was a static website deployed in Google Cloud Storage. The guidebook for the challenge also suggests using a frontend framework like React or Vue for this and starting with infrastructure-as-code from the beginning instead of as an afterthought.
Knowing in advance that I wanted to go beyond a basic website but not really feeling like I needed an SPA, I settled on the Django framework. It is a very mature, opinionated, “batteries included” web framework that I’ve never put into production use, so this was a good idea for the challenge. For my infrastructure-as-code framework, I chose Terraform.
Getting started
The project setup was broken down into a few digestible blocks:
- Initialise a Django project with dummy pages
- Initialise a Google Cloud Platform project
- Initialise a Terraform project
- Set up the load balancing
Django
Nothing hugely special here. I use Pipenv for virtual environments and dependency management. The main packages I install for the application are:
Once Django is installed it’s pretty easy to start the project - creating a project, then an “app” within it.
To start my new project, I ran django-admin startproject cloud_resume.
I called my initial app core - it holds all the content that isn’t in this blog - my digital resume, CSS, etc. To create that, I ran python manage.py startapp core from within the folder created by Django.
Django follows a “model-view-template” method of building applications. This is similar to “model-view-controller”. In Django, a “view” is a “controller” anywhere else, and a “template” is a “view”.
I highly recommend reading some of the Django tutorial to learn more. I will go into specific build details in later posts.
Google Cloud Platform
This is the easiest part. Go to Google Cloud, sign up for a free trial, create your first project by following the prompts, and you’re set.
Installing the Google Cloud CLI and setting it up with your project is the “hardest” part, and essential for using Terraform.
Terraform
You can download Terraform for free and get started immediately. It’s built in Go as a binary, so you can simply download and run it. I suggest adding it to your PATH variable so you can run it from anywhere. The way to do this will differ on Linux or Windows.
I use Terraform to control almost all pieces of my infrastructure. I have two exceptions that I create manually:
- My main service account that would run Terraform in a CI/CD pipeline
- The GCP project itself
You can use Terraform to create these, but I don’t currently. I’m sure it’s the “correct” way to manage everything with Terraform, but I haven’t figured out an elegant way to do it yet - feel free to ping me on LinkedIn if you have any suggestions!
A Terraform project is free-form, but I like to structure my projects with folders per cloud service I’m using. The full details of it can be found in the site’s repository, but it generally looks like this:
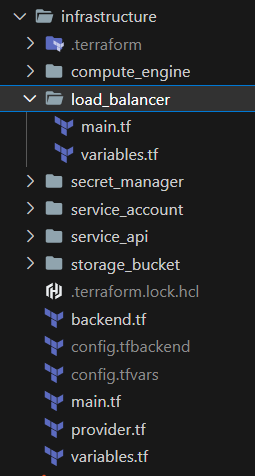
Each folder contains the code for a particular service (e.g. cloud storage, service APIs, the load balancer, etc). The main.tf file in the root of the Terraform project ties it all together.
The backend.tf file tells Terraform that the project’s state should be stored in a Google Cloud Storage bucket. In my project, this is configurable. In the screenshot above, config.tfbackend specifies a bucket name for the Terraform state to be stored in. config.tfvars specifies different variables that are set in the project and passed around to the different modules:
- What is my GCP project name?
- What domain am I using for the load balancer?
- Do I want to name all my resources after a specific app name?
In both cases I add these files to my .gitignore file so they aren’t tracked. None of these files contain sensitive data, but in a lot of Terraform projects they do, and it’s best practice to never source control them.
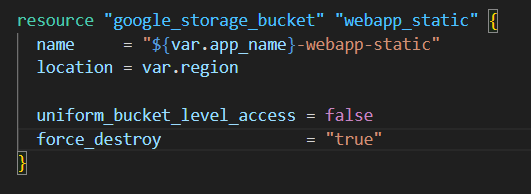
Terraform code is written in its own declarative language, HCL. The code below defines a Google Cloud Storage bucket:
Once everything is set up and ready to run, the following commands set everything up for me:
terraform init -backend-config config.tfbackend
terraform apply -var-file config.tfvars
The first step sets up the project files in my selected storage bucket. The second step will prompt to confirm, then issue commands to my GCP project to build everything.
Load Balancing
In order to set this up, I had to use GCP’s global external load balancer. This is not necessary if you follow the Cloud Resume Challenge to the letter, but knowing I was going to be running Django on Cloud Run, I had no other option.
Since I wanted to control this using Terraform, and had never used a load balancer before, I followed a few steps to get this going:
- Walked through the linked guide on global external load balancers
- Wrote Terraform code to re-create one from scratch based on the configuration I’d done in the UI
- Destroyed the manually-created load balancer and attempted to re-create it with Terraform
Terraform does support importing existing infrastructure into the project state, but you really need to get it right or Terraform will get confused and attempt to modify your infrastructure the next time you run it. I’ve found importing is fine with simple things like cloud storage buckets, but with a load balancer I opted to write it from scratch.
As part of this process, I had to go through provisioning the domain with Google Domains (soon to be moved to Squarespace).
I may go further into this in another post, but the Google guide is very good. Surprisingly, it mostly worked without a hitch. I mostly had issues with SSL certificates propagating and domains lining up.
In the next post, I’ll be covering setting up CI/CD for the Django application.
The merges to my repository that generally cover this entire post are here and here. Feel free to ping me on Linkedin if you ever want to chat or have any questions.
Thanks for reading.